
Reimbursements
Staff expenses from claim to payment — approved by the manager, with a second approval if your firm wants one, and billable costs pushed through to the client's invoice.
Reimbursements handles money your people spend on the firm's behalf — a filing fee, travel to a client, a stamp duty payment. A claim is submitted, approved, paid, and where it was incurred for a client, billed on.
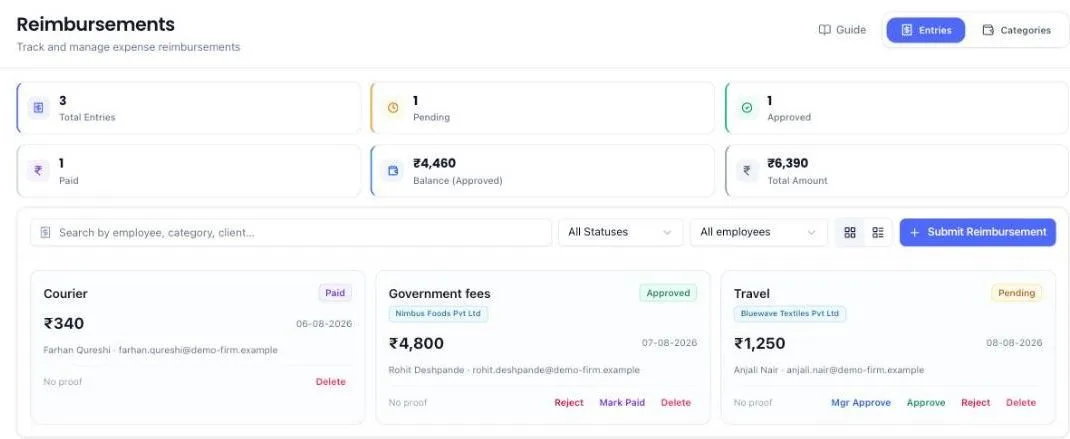
Before you start
- The module must be enabled for your firm.
- At least one category — travel, government fees, and so on. Set these up on the Categories tab first; a claim has to be filed under one.
Submit a claim
- Open Reimbursements from the left menu.
- Click Submit Reimbursement.
- Pick the category and enter the amount and the date the money was spent.
- If you spent the money for a client, pick that client under Client. You do not mark a claim billable yourself: your firm sets that once per category on the Categories tab, so the category list shows names only.
- Write a short description. "Cab to client meeting at Andheri" is what stops the approver having to come and ask you.
- Attach the bills under Proof Documents: click Upload proof document, or drag the files straight onto that box. You can add several — a cab receipt and a train ticket from the same trip go on the same claim. Pick more than one file at once, or add them one at a time. Images and PDFs only, up to 10 MB each, up to 10 documents.
- Check what you attached. Each file shows its name, its type and size, and a small preview once it has finished uploading. Attached the wrong bill? Click Replace beside it to swap in the right one, or the × to remove it — nothing is saved until you submit.
- Submit. It is now pending.
Some categories require a bill and refuse the claim without one. Those show Receipt required for this category above the upload box.
Check a claim before approving it
Click Review on any claim and a panel opens with everything the decision rests on: who claimed it, the client, the amount, the date the money was spent, the date it was submitted, the description, and every bill attached.
- Click a document to open it full size, or the download arrow to save a copy.
- Check the bill actually matches the amount and the date on the claim.
- Approve or reject from the buttons at the bottom of the panel.
A claim submitted with no bill says so plainly in that panel, so nobody approves one by accident.
Approve a claim
Unless your firm changes it, approval runs in two steps, done by different people:
- Manager approved — the claimant's manager, or a firm administrator, confirms the expense was real and reasonable.
- Approved — a firm administrator, or the employee's reporting partner, approves it for payment.
A rejected claim goes back to the employee with the reason, and only they can correct and resubmit it.
Let the manager's approval be final
If your managers already check every claim, the second approval only adds a wait. A firm owner or administrator can drop it from Settings:
- Open Settings and go to the Team tab. The quickest way: type Expense approvals into Search at the top of the left menu and open the result.
- Under Expense approvals, turn on Manager's approval is final.
From then on the manager sees one Approve button instead of Mgr Approve, and their approval makes the claim approved and ready to pay. The review panel shows a single approval step with the manager's name on it.
- Staff with no manager set still go to their reporting partner or a firm administrator.
- A claim the manager approved before you turned this on stays with the partner for the final approval.
- A firm administrator can still approve any claim directly.
Turn it off again at any time and new approvals go back to two steps.
Fix a rejected claim
Open the rejected claim and click Reapply. The reason it came back is shown at the top. Correct the amount, the date or the description, and attach the bills again — whatever you upload here replaces what was on the claim before, so upload every document you want the approver to see, not just the missing one. Resubmitting puts it back to pending.
Mark it paid
Once the money has actually gone out, mark the claim paid. Only approved claims can be marked paid, so the record never shows money paid on something nobody approved.
Bill it to the client
An approved billable claim joins the client's billing queue and goes onto their next invoice. The Balance (Approved) counter at the top is what is approved and not yet paid.
What the system does on its own
- Keeps the bills with the claim. Documents stay on the record after approval and after payment, so a claim can still be checked later.
- Chases unbilled costs. Once a week, approved billable claims sitting unbilled for more than a few days are flagged to that client's relationship manager — or the firm owner if none is set.
- Adds billable claims to the billing queue, so recovering a cost is not a separate memory exercise.
- Keeps the totals live at the top of the screen: pending, approved, paid, and the outstanding balance.
- Keeps unpaid claims on the dashboard. The Reimbursements card on the dashboard shows how many claims are waiting for approval, how many are waiting on final approval, and how much is approved but not yet paid. An approved claim stays counted there until someone marks it paid.
What you cannot do (and what to do instead)
- You cannot approve your own claim. It goes to your manager or a firm administrator.
- A partner cannot approve ahead of the manager. While a claim is waiting on the employee's manager, only that manager or a firm administrator can move it on.
- You cannot mark an unapproved claim paid. Approve it first.
- You cannot reject a claim that has been paid. The money has gone — handle it outside the system.
- Only the employee can resubmit their own rejected claim. A manager cannot fix it for them.
- You cannot submit a claim in a receipt-required category with no bill attached. Attach one, or file it under a category that does not require one.
- You cannot attach anything but an image or a PDF, up to 10 MB each, and no more than 10 per claim.
Common questions
Billable or non-billable?
Billable if the client is being asked to repay it. Non-billable is a cost the firm absorbs. It is set on the category, on the Categories tab, not on each claim. Name the client on a billable claim, otherwise it has no invoice to go onto.
Can I attach more than one bill?
Yes. Up to 10 per claim. One trip that produced a cab receipt and a hotel invoice is one claim with two documents, not two claims.
My claim was rejected. Now what?
Read the reason, correct it, and resubmit. Only you can — it is your claim.
Why is a receipt required on some categories and not others?
Because your firm set it that way on the category. Change it on the Categories tab.
Every claim comes to the firm owner. Can the manager approve on their own?
Yes. Go to Settings → Team → Expense approvals and turn on Manager's approval is final. Claims from staff who have a manager are then fully approved by that manager.
More guides
Every other part of the product, the same way.